Share your app
Now that your app is deployed you can easily share it and collaborate on it. But first, let's take a moment and do a little joy dance for getting that app deployed! 🕺💃
Your app is now live at that fixed URL, so go wild and share it with whomever you want. Your app will inherit permissions from your GitHub repo, meaning that if your repo is private your app will be private and if your repo is public your app will be public. If you want to change that you can simply do so from the app menu.
Sharing private apps
By default all apps deployed from private source code are private to the developers in the workspace. Your apps will not be visible to anyone else unless you grant them explicit permission. You can grant permission either in your workspace or from the app itself.
What is viewer auth?
Viewer auth allows you to restrict the viewers of your app. To access your app, users have to authenticate using an email-based passwordless login or single sign-on (SSO).
Configuring single sign-on
Google OAuth is enabled by default, so if your company uses Google, you're good to go. If you've configured SSO for your organization via ADFS, Azure, Okta, or generic SAML, you will also be able to add email addresses and domains which are administered by those services. Read here for how to enable SSO for your org.
Once you have added someone's email address to your app's viewer list, that person will be able to sign in via Google Single Sign-On or your organization-specific Single Sign-On and view your app. They will also receive an email inviting them to view your app. If they are already logged in with that account in their browser (the usual case for most people) then they will automatically be able to view the app. If they are not logged in, or they have not been giving access, then they will see a page asking them to first log in.
Tip
Having trouble granting access? Is a viewer having trouble logging on? See our troubleshooting section for help.
Granting access to your entire organization
If you add an entire email domain, anyone with an email address which uses that domain will be able to view your app after authenticating themselves. For example, if "foo.com" is added to the list of allowed email domains, anyone with an email address that ends in "@foo.com" will be allowed to view the app.
Adding viewers from the app
From your deployed app you can easily add viewers from your developer console.
Select "Manage app" in the lower right corner.

Choose "Settings" from the menu.

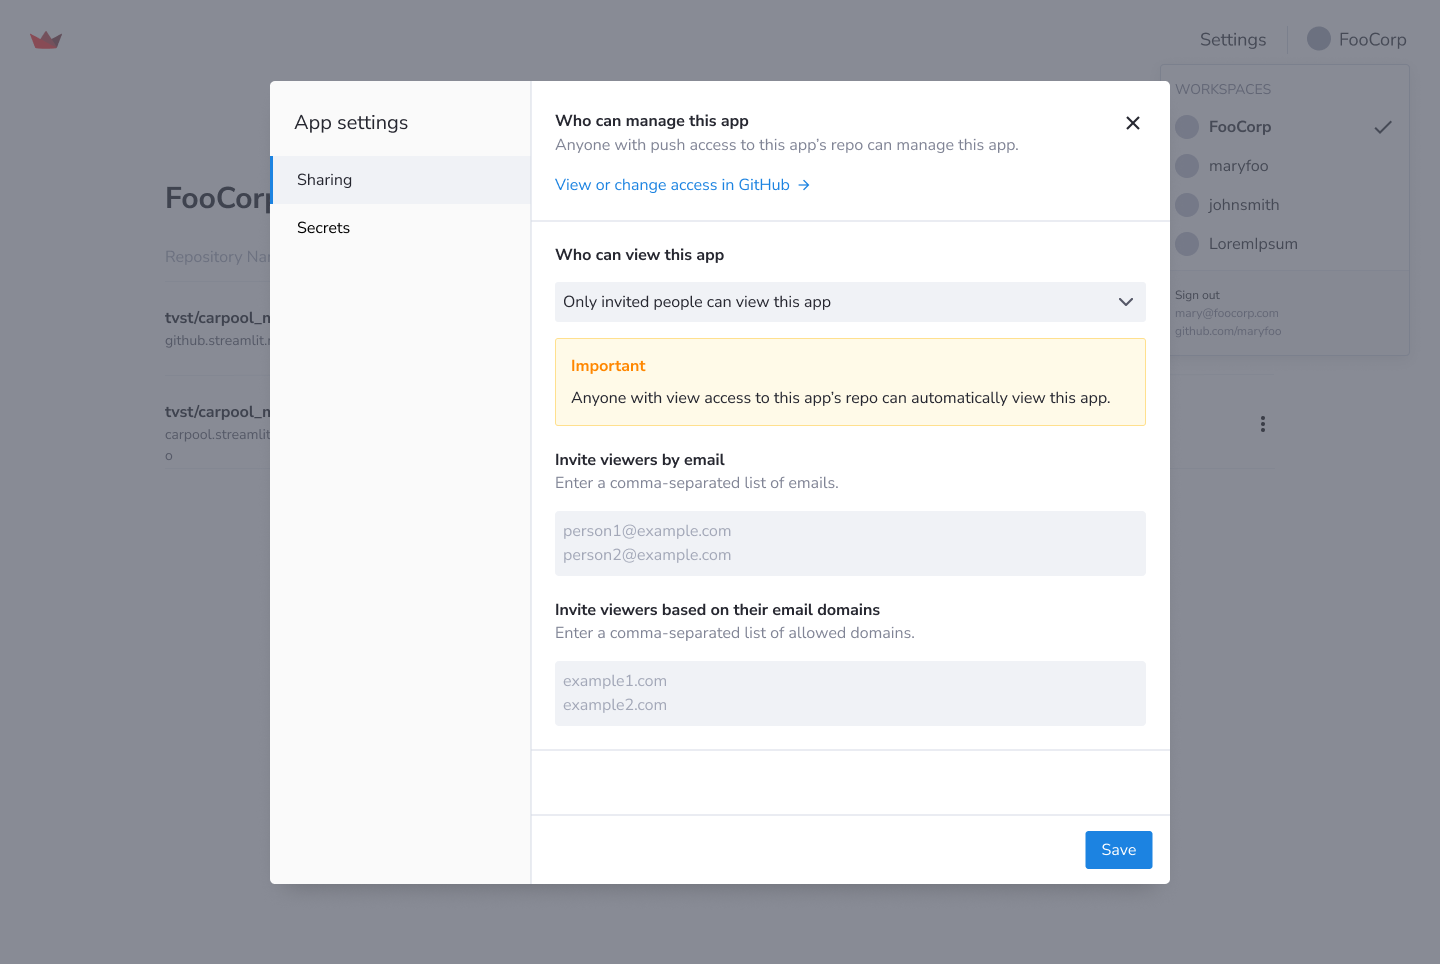
Add Viewers in Settings.
You can choose to allow anyone from a domain, for example allowing "foo.corp" would allow anyone with an email from foo.corp. Or you can choose to allow only selected viewers based on their individual emails. Make sure to enter them as a line-separated list.
Adding viewers from your dashboard
You can also add viewers directly from your dashboard.
Open settings for your app
Navigate to the app you want to add viewer to and click the hamburger icon to select "Settings."
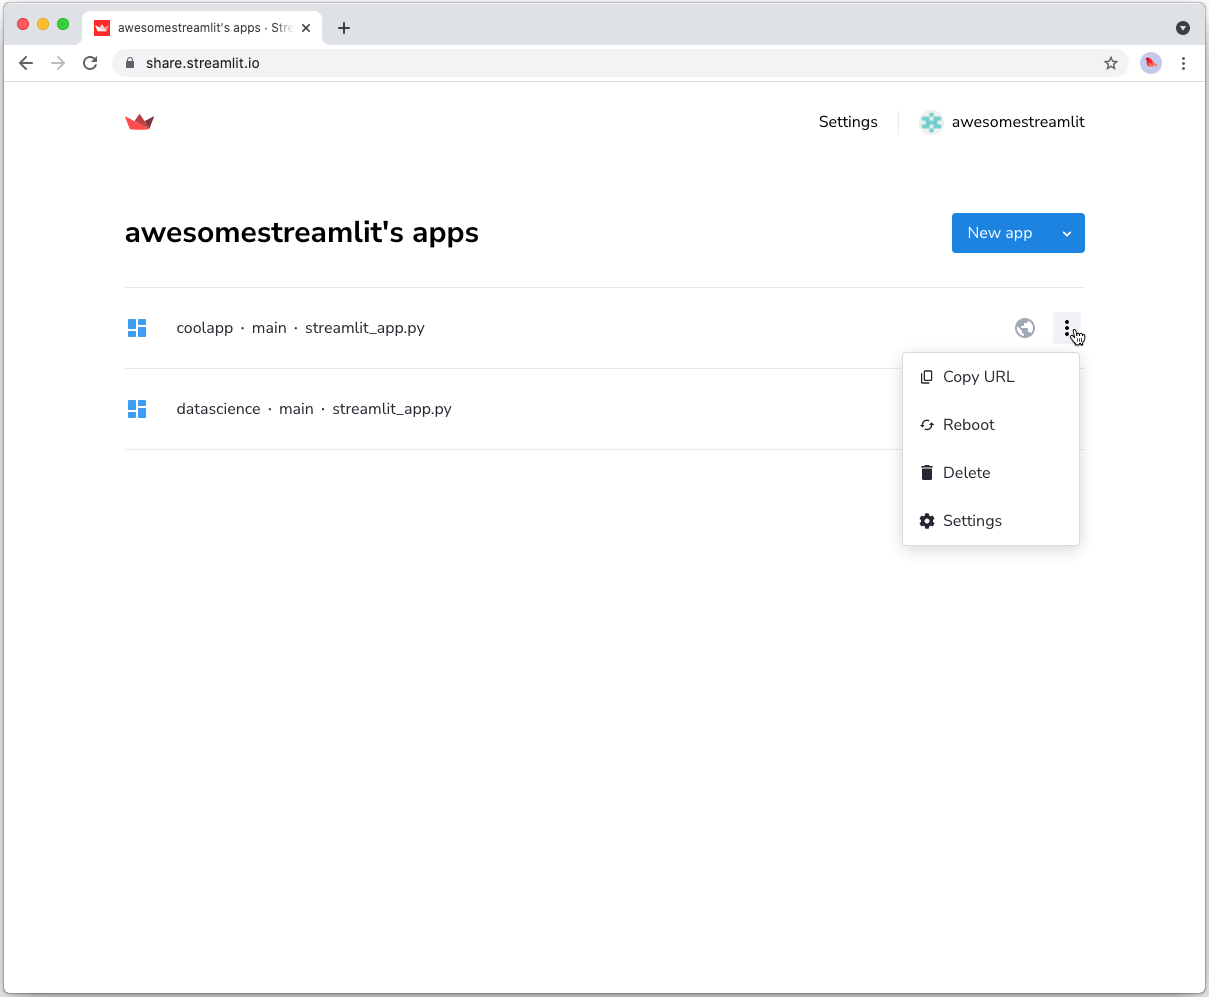
Add Viewers in Settings
Click on the "Sharing" section in the App Settings and in the text input area, provide a line-separated list of email addresses for the users you wish to grant viewer access to your app, or provide a line-separated list of allowed email address domains. Click "Save."
Sharing public apps
From your deployed app you can click on the "☰" menu on the top right and select 'Share this app' to post it directly into social media or to share with the community on the Forum. We'd love to see what you make and perhaps feature your app as our app of the month ❤️.
Add a GitHub badge
To help others find and play with your Streamlit app, you can add Streamlit's GitHub badge to your repo. Below is an example of what the badge looks like. Clicking on the badge takes you to, in this case, Streamlit's Face-GAN Demo.
Once you deploy your app, you can embed this badge right into your GitHub README.md by adding the following Markdown:
[](https://share.streamlit.io/[user name]/[repo name]/[branch name]/[app path])
Note
Be sure to replace https://share.streamlit.io/[user name]/[repo name]/[branch name]/[app path] with the URL of your deployed app!
Adding developers
Inviting other developers is simple, just invite them to your GitHub repository so that you can code on apps together, and then have them log in to share.streamlit.io. If you are working as a team, you likely are already in the same repos, so skip step 1 and go straight to having them log into share.streamlit.io
Streamlit Cloud inherits developer permissions from GitHub, so when your teammates log in, they will automatically view the workspaces you share. From there you can all deploy, manage, and share apps together.
Pushing new code
You can also collaborate with other developers by having multiple contributors pushing to the same GitHub repo. Whenever anyone on the team updates the code on GitHub, the app will also automatically update for you!
If you want to try out something new while still keeping your original app running, just create a new branch, make some changes, and deploy a new version of the Streamlit app.
Finding app code
Every deployed app has its Github source code linked in the "☰" menu on the top right. So if you are looking to understand the code of another Streamlit app, you can navigate to the GitHub page from there and read or fork the app.